Wednesday, July 1, 2015

Small Gardening Projects, Perfect for Small Hands!


Repotting Plants

Have you been putting off small gardening projects like repotting/relocating plants around your garden because they are “small” projects, and you’ll (probably) get around to doing them eventually?  Well, put them off no longer.  They are a perfect activity for your little preschooler this summer, and here are ten reasons why.

  1. Children love to play in dirt!  They are closer to the ground and are ready to make new discoveries with what they see and touch. It’s hands-on exploration at its best!
    Scooping Dirt
  2. At this age, children love to help!
  3. Gardening is educational for this age group.  You can talk about plants being living organisms.  They need food, water, sunlight, and space to grow and thrive.  Show the roots of a plant where it takes up nourishment (food and water) from the soil.  The green leaves soak up energy from the sun.  By gardening, you are making space for plants. 
  4. Gardening is a great introduction to some very important life lessons, such as patience, rewards of nurturing skills, responsibility, and even loss.
  5. Gardening can also help initiate environmental awareness through understanding the importance of plants as the primary producers in the web of life.
  6. Physically, gardening helps young children learn control when pouring dirt or water around a plant.
  7. Gardening can create a relaxing space to be enjoyed for years to come.  A garden can reduce stress and is a place to spend time outdoors.
  8. It’s easy to find (adorable) kid-sized gardening tools in any garden center where adult-sized tools can be found.  But, children don’t really need tools to play in the dirt (It’s fun either with or without tools)!
  9. Gardening gives young children pride in their new abilities to help and care for another living thing.
  10. Most importantly, it’s an activity you can do as a family!

So get out there and start gardening with your child!
Patting the Dirt


Watering the Newly Planted Plant


Friday, May 8, 2015

A Mother's Love


Two Juvenile Red-Shouldered Hawks in Nest
Last week, I was thinking about wild animal moms and which animal I wanted to focus on for Mother’s Day.  I decided to write about our local red-shouldered hawks (Buteo lineatus); because they decided to build a nest in our neighbor’s front yard a couple of months ago, with easy viewing from my daughter’s bedroom window.  I knew there was at least one baby in the nest since I had seen the parents feeding it.  So last Saturday morning, I spent some time outside with my camera and binoculars trying to get a glimpse of it.  That was not easy since the nest is probably 50 plus feet up a pine tree. Be that as it may, I did see them, and there were two juveniles!  Sadly, later that same day, I learned from my neighbor that one of the babies had fallen out of the nest.  As a mom, I was devastated!  How could a baby survive that fall?  And how would I explain it to my daughter?  Clearly, this was not a great subject for a Mother’s Day conversation.

Seeing two baby birds that morning was exhilarating for me.  My husband and I have lived in our house since long before our daughter was born, and we feel like we know at least one of these birds pretty well.  If you have a red-shouldered hawk where you live, you know it.  They are very vocal birds of prey repeating a loud “Kee-aah” scream that can be heard more than a mile away.  Our pair usually nested in our back woods where we would hear them on a regular basis.  Over the years, the parents often hunted for snakes and lizards in our yard.  They even regularly watched my husband as he mowed grass hoping an easy meal would be scared out into the open.  The hawks usually had one baby each summer that fledged the nest.  Of course the parents continued caring for their young until it reached about 18 weeks old and could take care of itself.  During that time, the parents would often bring their fledgling to our yard during the day while they hunted.  My husband and I have called our yard their nursery on many occasions.  I suppose it was a safe place for the youngster to practice hunting lizards.

Unfortunately, one of the pair died in our yard one spring, several years ago.  My husband and I were away when it happened, but I can only imagine the bird broke its neck during the hawk’s elaborate mating ritual of flying high into the air and then taking a sharp dive towards the ground.  It is well documented that power lines often kill birds of prey with similar mating rituals.  Although we don’t have any power lines in our back yard, we do live in the woods with many tree limbs as obstacles.  Being monogamous animals, it took the surviving bird a couple of years before it found another mate.  My husband and I were so happy when we started hearing a second red-shouldered hawk echoing the calls of our local bird.

They’ve had a few babies over the years, but it was thrilling this year to be able to watch these doting parents pick just the right nesting materials and nurture their young these past couple of months.  They are such good parents.  Unfortunately, males and females look very similar, so we can’t tell which one is at the nest at any given time.  But they seem to take turns with all their child care duties, and even more so now.

Juvenile Hawk Found on Ground
I’m happy to report the baby bird that fell out of the tree survived the fall.  On Saturday afternoon, the neighbor found the bird hiding next to her house, a little shaken and crouched down on the ground.  When it stood, it was a little wobbly.  It had made it to the ground about 70 or 80 feet from its tree.  Luckily, it had most of its feathers, which must have helped it glide to the ground for a survivable landing.  My first worries were that it may have broken a wing or leg.  I did see it stretch its wings that first evening and noticed its flight feathers were not fully grown yet, but its wings seemed to be okay.  We just needed to wait and see if its parents would still take care of it and if it would survive the night.  

Juvenile Hawk Checking Out the Yard
The juvenile made it through the first night and the parents were taking care of it!  Monday morning I saw the young bird ripping something apart to eat it.  That evening, my neighbor saw one parent bring a snake, and the parent stayed and watched while baby ate it.  The next evening, snake was for dinner again.  When the juvenile was hungry, usually in the morning or evening, it called almost nonstop until a parent arrived with food.  It explored a little around the yard and even flew up to perch on the chain link fence near its new home site a couple of times, proving its wings were working a little.  Unfortunately however, the baby was still in danger from predation as long as it was on the ground.  With a coyote spotted in the area recently, we were worried about our newest feathered neighbor.

Juvenile Hawk Perched on Fence
Even though I can’t tell which parent is the mother, I know one of them is.  Just like human moms, she is dedicated to her children.  As long as her babies are alive, she will take care of them.  Even though my neighbor and I were watching over this baby, ready to step in and call the Florida Wildlife Commission (FWC) if necessary, the mom would not give up on her baby.  She stayed strong and brave even though her baby landed next to a human house inside a fenced yard.  Without her, the baby wouldn’t have survived!

Fledgling Returns to Tree while Parent Feeds Nestling
On Wednesday morning, the baby bird was gone!  I heard red-shouldered hawk calls coming from the nest.  I looked up and found a parent feeding the sibling in the nest and the other juvenile perched about a foot from the nest looking down at me!  It was our baby bird!  He made it back to the nest!  I can only imagine the relief (anthropomorphizing here because it’s a huge relief to me) for its mother to know her baby was home and safe again.  There’s nothing like a mother’s love.  It’s a strong instinct that bonds and protects children for the rest of their lives.

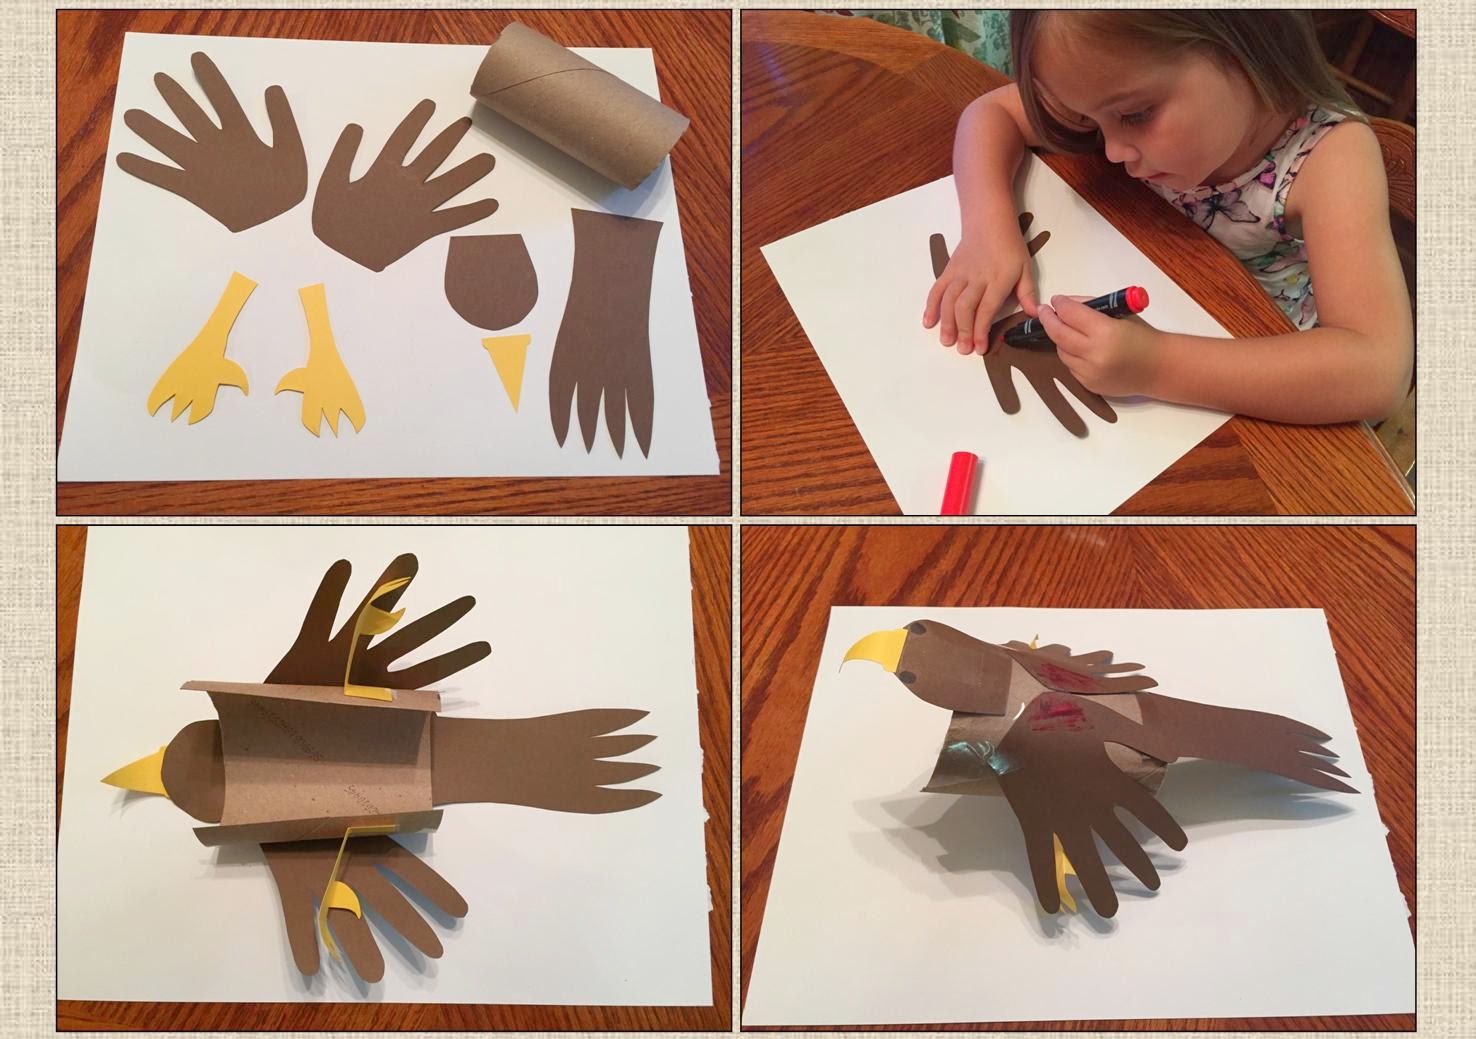
Red-Shouldered Hawk Craft
To celebrate the exciting return to the nest, my daughter and I made a hawk out of construction paper and the cardboard from a roll of toilet paper (you can also use paper towel roll cut to the size of a toilet paper roll).  I traced my daughter’s hand on two pieces of brown construction paper and cut them out to make the wings.  Next I cut out a tail and head from the brown construction paper and talons/legs and a beak from yellow construction paper.  My daughter used a red marker to add a little coloring to the shoulder of each wing.  I helped her tape (you can use glue if you’re not in a hurry) each body part to the paper roll in the correct place.  Then I cut a straight line down the middle of the paper roll (the belly of the bird), running between the legs.  This allowed my daughter to wear the bird on her arm while she played and “flew” with it around the yard.  It’s easy and makes a fun toy.  Just remember, it doesn’t have to be perfect because it’s a craft for children to play with and enjoy.  Plus, you can always make another one later!
Flying Hawk Craft

Happy Mother’s Day!


* I know both hawk parents helped to insure their juvenile’s survival; and likewise, many moms rely on dads to help care for and protect their children.  Dads are great too.  But this is Mother’s Day, and today we are celebrating Moms!

Tuesday, April 28, 2015

It's a Ladybug's Life!


Letting Our Ladybugs be Free
My daughter was so excited to get an Insect Lore Ladybug Land habitat from one of her friends for her birthday.  At first, she wasn’t sure what to do with it since the live insects needed to be ordered and sent to our home via snail mail.  So she played with the enclosure for a few days, finding her smallest toys, which just fit in it.  I let her know what day the bugs would be arriving and explained to her that they would not look like ladybugs yet, but were larvae.  Fortunately, since she recently had a lesson on butterfly lifecycles at her preschool, the larval stage was fresh in her memory.

Nineteen little bugs arrived in a tube on a Friday.  My daughter anxiously watched as I slid the little creatures and their food into their new home and gave them a couple droplets of water.  But to my daughter, the larvae were so small and strange-looking, her attention started to waver.  I quickly found videos of ladybugs on the internet to keep her excitement high for these new bugs.  Luckily, by the next day, the larvae were nearly twice as big, very active, and much more visible.  The change was perfect to keep her interest high.  These bugs ate and ate and grew bigger and bigger each day.  My daughter even asked us to buy a magnifying glass to help her see them better.  
 
Because it was very important not to over water the little bugs, I took charge of giving them water using the pipette provided with the habitat.  My three year old doesn’t quite have the fine motor skills required to gently squeeze the bulb of the pipette to consistently produce only one droplet of water at a time yet.  So after my watering chore each day, she practiced using the pipette herself, which is an excellent activity for kids her age.
Larva, Pupa, and Adult Stages
On day five, the first larva turned into a pupa.  By the end of the next day, they had all changed, and then there was no movement in the habitat for days.  Fortunately, the instructions gave us an estimate of when to expect the adults to emerge; therefore, we knew we didn’t have long to wait.  We were prepared with a rehydrated raisin cut in half for their food.  And four days later, our first adult ladybug emerged!  The rest followed over the next two days.  I was lucky enough to watch and record one emerging using time-lapse videography while my daughter napped.  This allowed me to show her later what was happening without her shorter attention span preventing her from watching in real time.  She was amazed and watched the video over and over again!

Mating Behavior
When a ladybug emerges from the pupa stage, it climbs out of the bottom of the hard exoskeleton, leaving it behind.  The newly emerged adult is soft and off-white in color without spots.  It rests and dries its body for awhile, stretching its wings and legs only occasionally while slowly gaining its familiar ladybug coloring.  During the first day, it doesn’t really move much.  Then on day two as an adult, it moves everywhere, taking short breaks to eat and drink.  We even witnessed mating behavior!  Our ladybugs seemed to only calm down when the lights were off.  It was fun watching them travel during the day, but it made them difficult to count while my daughter eagerly watched.  I’m happy to report, while they were at rest, I counted and all nineteen insects made it to the adult stage.

Last Saturday, we turned them loose.  It was nice to watch all of the ladybugs crawl away.  A few even attempted to fly away.  My daughter was a little sad and questioned several times why we needed to set them free, but she enjoyed watching the bugs crawl over the plants and in the leaf litter.  She agreed that it will be nice to have them living in our yard; although, she thinks we’ll be able to find them again easily.  Luckily, the ladybug habitat is able to be used again and again for raising more ladybugs!
Making a Ladybug Keepsake
Since this project took two weeks, I decided we needed to make a keepsake of our experience.  So I bought a small canvas and acrylic paint to make a handprint bush with 19 ladybugs made from fingerprints.  I painted the canvas blue the day before and let it dry overnight.  The next day, I painted my daughter’s hand a dark green color and let her put her handprint on the canvas, with my help, and we let it dry.  For the next step, I painted her other hand a light green color and again helped her to put her handprint on the canvas on top of the first handprint.  The handprints made the bush.  After the bush was completely dry, I painted her index finger red, and she proceeded to make 19 fingerprints on the bush, one for each ladybug we raised.  After that was dry, I took a black paint pen and completed the look of each ladybug.  It turned out to be a beautiful keepsake of our first experience with ladybugs that we will never forget!
Ladybug Keepsake

Wednesday, April 22, 2015

Earth Day, Every Day!


Enjoying the Great Outdoors

Today is Earth Day!  It’s a day to celebrate the Earth and promise to take care of it.  I’m glad we have a reminder every year, but shouldn’t we be doing these things every day?  So for Earth Day, this week, next week, next month, and throughout the year, take time to enjoy our Earth.  Smell the sweet honeysuckle flower, listen to a mockingbird sing, feel the grass between your fingers and toes, watch a honeybee collect pollen, and discover something new in the great outdoors!  Only then will we understand how invaluable our planet is so we will take care of it.

Limpkin Crossing Our Path
My daughter and I did talk about Earth Day.  We took a walk around a pond to try to discover something new.  We watched ducks and smelled flowers, but our find of the day was a limpkin (Aramus guarauna) crossing our path.  This bird is listed as a Species of Special Concern in Florida, and they’re somewhat rare.  It used to be common; however because its main food source (the Florida apple snail, Pomacea paludosa) has become scarce, the limpkin likewise has become an unusual sight.  The limpkin was the ideal discovery for Earth Day, I think.  My daughter learned that we need to protect the Earth by reducing, reusing, and recycling and keeping our natural areas natural in order to support the perfect habitat for the apple snails and so also protect limpkins.  

Since my daughter has been enjoying the decorations of recent past holidays, we decided to decorate for Earth Day too!  Unfortunately, Earth Day decorations are not very common, so we made our own.  We used coffee filters and washable markers (Crayola has recycled plastic markers made with solar energy!)  My daughter and I colored the filters to look like the Earth, or at least we used mainly green and blue markers.  Then we took a spray bottle filled with water and sprayed the filters just enough to let the colors run.  Each decoration turned out beautiful and unique.  I wrote, “Earth Day, Every Day!” on one of them.  We taped them to our lanai door, which is our entrance to the great outdoors!  They are a little stronger than paper, so we can use them year after year for our Earth Day decorations.  You can too!  This is a simple craft that looks great no matter what your child’s coloring skills are.  Enjoy your Earth Day!
Craft Supplies

Coloring a Coffee Filter

Spraying with Water
Decorating for Earth Day

Ready for Earth Day!  Let's Go Outside!